
Verwandte Artikel zu Learn Easy Sewing Skills: Simple Steps for 11 Sunny...
Inhaltsangabe
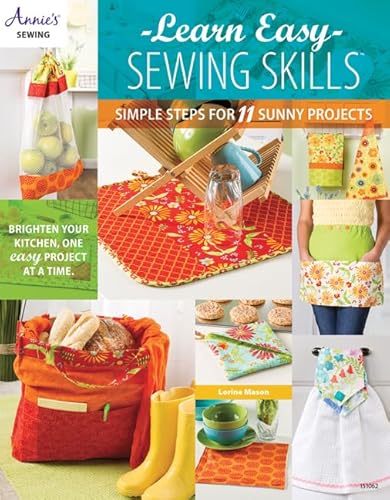
Want to watch something wonderful take shape? Grab a front row seat at your sewing machine and observe as clever pot holders and stylish totes nearly magically appear at your fingertips. Having fun and learning to sew go hand in hand thanks to Lorine Mason&;s Learn Easy Sewing Skills. Start at the very beginning with basic explanations and easy practice exercises. Then conjure up any of 11 show-stopping kitchen projects. Your family and friends will be amazed at your enchanting sleight of hand.
Die Inhaltsangabe kann sich auf eine andere Ausgabe dieses Titels beziehen.
Über die Autorin bzw. den Autor
Lorine Mason is an author, a project designer, and a regular columnist. She is the author of Boutique Slippers, Dressing Up 18" Dolly, Lots to Love Babies on the Go!, Love to Dress Up 18" Doll Clothes, Love to Dress for Work & Play, and Scrubs & More. She lives in Herndon, Virginia.
Auszug. © Genehmigter Nachdruck. Alle Rechte vorbehalten.
Learn Easy Sewing Skills
Simple Steps for 11 Sunny Projects
By Lorine MasonAnnie's
Copyright © 2014 Annie's
All rights reserved.
ISBN: 978-1-57367-576-5All rights reserved.
Contents
Can-Do Dishcloth,
Blue Ribbon Tea Towel,
Sitting Pretty Shelf & Drawer Liners,
Short & Sweet Apron,
Smart Cookie Pot Holder,
Eat-Dessert-First Place Mat,
Runway Table Runner,
Dirndl Skirt Kitchen Towel,
To Market, to Market Produce Bag,
Soft Spot Drying Mat,
Baker's Dozen Tote Bag,
The Basics of Sewing,
CHAPTER 1
Can-Do Dishcloth
One side works while the other side cheers! By backing merry prints with hardworking textures, all kitchen tasks are made brighter, from picking up spills to polishing glass.
Finished Size
11 x 11 inches
Materials
• 1 fat quarter or 3/8 yard cotton print
• 3/8 yard monk's cloth
• Coordinating thread
• Basic sewing supplies and equipment
Fabric Choices
Substitute any of these utility fabrics for monk's cloth:
• Waffle weave
• Huck toweling
• Terry cloth
• Diaper cloth
Cutting
From cotton print:
• Cut 1 (12-inch) square.
From monk's cloth:
• Cut 1 (12-inch) square.
Sewing Techniques
Machine stitching:
Straight stitching
Topstitching
Zigzag stitching
Assembly
Use a ½-inch seam allowance and stitch right sides together unless otherwise indicated.
1. Finish all edges of the monk's cloth square with a zigzag stitch to prevent edges from fraying during construction.
2. Layer and pin print and monk's cloth squares right sides together, matching outside edges.
3. Stitch around the outside edges, pivoting at corners. Leave a 3-inch opening along one side for turning (Figure 1).
4. Clip corners at an angle referring to Figure 2.
5. Turn dishcloth right side out through opening. Turn opening seam allowances to inside and pin in place. Press edges flat.
6. Topstitch around dishcloth ¼ inch from edge and again ¼ inch from first stitching to complete the dishcloth (Figure 3).
CHAPTER 2Blue Ribbon Tea Towel
If a kitchen towel is for work, and a tea towel is for display, this easy-to-make beauty will certainly steal the show.
Finished Size
20 x 26 inches
Materials
• 1 fat quarter or 1/8 yard orange tonal
• 1 fat quarter or ¼ yard each orange floral and yellow print
• 1 fat quarter or ½ yard yellow floral
• Coordinating thread
• Basic sewing supplies and equipment
Cutting
From orange tonal:
• Cut 1 (3 x 22-inch) rectangle.
From orange floral:
• Cut 1 (6 x 22-inch) rectangle.
From yellow print:
• Cut 1 (6 x 22-inch) rectangle.
From yellow floral:
• Cut 1 (16 x 22-inch) rectangle.
Sewing Techniques
Machine stitching:
Straight stitching
Topstitching
French seam
Double-turned hem
Assembly
Use a ½-inch seam allowance and stitch right sides together unless otherwise indicated. Note that the first step of a French seam uses a ¼" seam allowance.
1. Referring to Figure 1 for order, stitch the orange and yellow floral rectangles together using a French seam.
2. Press the seam toward the yellow floral rectangle and topstitch ¼ inch from the seam through all layers (Figure 2).
3. Repeat to stitch and topstitch all rectangles together pressing seam allowances, referring to arrows in Figure 3.
4. Stitch a ½-inch double-turned hem on both long sides of the towel and then on the top and bottom (Figure 4).
CHAPTER 3Sitting Pretty Shelf & Drawer Liners
Illuminate every nook and cranny in your kitchen with colorful cotton liners. The perfect pairing of pretty (flowered fabric) and practical (nonskid backing), they will stay in place while protecting work and storage surfaces.
Finished Size
Shelf or drawer measurements
Determining Shelf/Drawer Size & Yardage
Measure the interior width and depth of either the shelf or drawer referring to Figure 1.
Add 1 inch to each measurement to determine the size rectangle or square needed to make the liner. Purchase enough fabric and nonskid backing yardage to cut the determined size.
For example, if the drawer's inside measurements are 15 inches wide x 22 inches long, you will cut 16 x 23-inch rectangles. This means you will need to purchase ½ yard each of fabric and nonskid backing.
Materials
• Yardage determined for cotton print and nonskid backing referring to Determining Shelf/Drawer Size & Yardage
• Coordinating thread
• Basic sewing supplies and equipment
Cutting
• Cut 1 rectangle the determined size from the cotton print and nonskid backing referring to Determining Shelf/Drawer Size & Yardage.
Sewing Techniques
Machine stitching:
Straight stitching
Topstitching
Hand stitching:
Slip stitch
Assembly
Use a ½-inch seam allowance and stitch right sides together unless otherwise indicated.
1. Layer and pin print and nonskid backing rectangles right sides together matching outside edges.
2. Stitch around outside edges pivoting at corners. Leave a 3-inch opening along one side for turning (Figure 2).
3. Clip corners at an angle referring again to Figure 2.
4. Turn liner right side out through opening. Turn opening seam allowances to inside and pin in place. Press edges flat.
5. Topstitch around liner ¼ inch from edge to complete the liner (Figure 3).
CHAPTER 4Short & Sweet Apron
This apron is small on coverage but big on pockets. Add three decorative buttons to the ribbon waistband and move from island, to oven to fridge in style.
Finished Size
15 x 21 inches (not including ties)
Materials
• 1/3 yard orange print
• 5/8 yard green floral
• 2½ yards 1-inch-wide coordinating grosgrain ribbon
• 3 (5/8-inch-diameter) coordinating buttons
• Coordinating thread
• ¼-inch-wide basting tape
• Basic sewing supplies and equipment
Cutting
From orange print:
• Cut 1 (10½ x 22-inch) rectangle for pocket.
From green floral:
• Cut 1 (18 x 22-inch) rectangle for apron.
Sewing Techniques
Machine stitching:
Straight stitching
Topstitching
Edgestitching
Double-turned hems
Assembly
Use a ½-inch seam allowance and stitch right sides together unless otherwise indicated.
1. Apply basting tape to wrong side of one 22-inch-wide end of pocket. Fold edge ¼ inch to wrong side (Figure 1).
2. Turn and press folded edge 1¼ inch to wrong side and edgestitch along first fold (Figure 2).
3. Layer and pin pocket right side down on wrong side of apron rectangle matching raw 22-inch bottom edges; stitch together (Figure...
„Über diesen Titel“ kann sich auf eine andere Ausgabe dieses Titels beziehen.
Suchergebnisse für Learn Easy Sewing Skills: Simple Steps for 11 Sunny...

Foto des Verkäufers
Annie's Sewing Learn Easy Sewing Skills Book
Anbieter: Zoom Books East, Glendale Heights, IL, USA
Verkäuferbewertung 5 von 5 Sternen

Zustand: very_good. Book is in very good condition and may include minimal underlining highlighting. The book can also include "From the library of" labels. May not contain miscellaneous items toys, dvds, etc. . We offer 100% money back guarantee and 24 7 customer service. Bestandsnummer des Verkäufers ZEV.1573675768.VG
Gebraucht kaufen
EUR 5,44
Versand gratis
Versand innerhalb von USA
Versand innerhalb von USA
Anzahl: 1 verfügbar
Beispielbild für diese ISBN
Learn Easy Sewing Skills: Simple Steps for 11 Sunny Projects (Annie's Sewing)
Anbieter: HPB-Emerald, Dallas, TX, USA
Verkäuferbewertung 5 von 5 Sternen
Paperback. Zustand: Very Good. Connecting readers with great books since 1972! Used books may not include companion materials, and may have some shelf wear or limited writing. We ship orders daily and Customer Service is our top priority! Bestandsnummer des Verkäufers S_475694898
Gebraucht kaufen
EUR 3,69
EUR 3,36 Versand
Versand innerhalb von USA
Versand innerhalb von USA
Anzahl: 1 verfügbar
Beispielbild für diese ISBN
Annie's Sewing Learn Easy Sewing Skills Book
Verlag:
Vista Partners Inc. (edition ), 2014
ISBN 10: 1573675768
ISBN 13: 9781573675765
Gebraucht
Paperback
Anbieter: BooksRun, Philadelphia, PA, USA
Verkäuferbewertung 5 von 5 Sternen
Paperback. Zustand: Very Good. It's a well-cared-for item that has seen limited use. The item may show minor signs of wear. All the text is legible, with all pages included. It may have slight markings and/or highlighting. Bestandsnummer des Verkäufers 1573675768-11-1
Gebraucht kaufen
EUR 7,09
Versand gratis
Versand innerhalb von USA
Versand innerhalb von USA
Anzahl: 1 verfügbar
Beispielbild für diese ISBN
Learn Easy Sewing Skills: Simple Steps for 11 Sunny Projects
Anbieter: ThriftBooks-Dallas, Dallas, TX, USA
Verkäuferbewertung 5 von 5 Sternen
Paperback. Zustand: Good. No Jacket. Pages can have notes/highlighting. Spine may show signs of wear. ~ ThriftBooks: Read More, Spend Less. Bestandsnummer des Verkäufers G1573675768I3N00
Gebraucht kaufen
EUR 7,37
Versand gratis
Versand innerhalb von USA
Versand innerhalb von USA
Anzahl: 1 verfügbar
Beispielbild für diese ISBN
Learn Easy Sewing Skills: Simple Steps for 11 Sunny Projects
Anbieter: ThriftBooks-Atlanta, AUSTELL, GA, USA
Verkäuferbewertung 5 von 5 Sternen
Paperback. Zustand: Good. No Jacket. Pages can have notes/highlighting. Spine may show signs of wear. ~ ThriftBooks: Read More, Spend Less. Bestandsnummer des Verkäufers G1573675768I3N00
Gebraucht kaufen
EUR 7,37
Versand gratis
Versand innerhalb von USA
Versand innerhalb von USA
Anzahl: 1 verfügbar
Foto des Verkäufers
Annie's Sewing Learn Easy Sewing Skills Book
Anbieter: Blue Vase Books, Interlochen, MI, USA
Verkäuferbewertung 5 von 5 Sternen
Zustand: good. The item shows wear from consistent use, but it remains in good condition and works perfectly. All pages and cover are intact including the dust cover, if applicable . Spine may show signs of wear. Pages may include limited notes and highlighting. May NOT include discs, access code or other supplemental materials. Bestandsnummer des Verkäufers BVV.1573675768.G
Gebraucht kaufen
EUR 7,38
Versand gratis
Versand innerhalb von USA
Versand innerhalb von USA
Anzahl: 1 verfügbar
Beispielbild für diese ISBN
Learn Easy Sewing Skills: Simple Steps for 11 Sunny Projects (Annie's Sewing)
Anbieter: HPB Inc., Dallas, TX, USA
Verkäuferbewertung 5 von 5 Sternen
paperback. Zustand: Very Good. Connecting readers with great books since 1972! Used books may not include companion materials, and may have some shelf wear or limited writing. We ship orders daily and Customer Service is our top priority! Bestandsnummer des Verkäufers S_482615625
Gebraucht kaufen
EUR 5,52
EUR 3,36 Versand
Versand innerhalb von USA
Versand innerhalb von USA
Anzahl: 1 verfügbar
Beispielbild für diese ISBN
Learn Easy Sewing Skills: Simple Steps for 11 Sunny Projects (Annie's Sewing)
Anbieter: Orion Tech, Kingwood, TX, USA
Verkäuferbewertung 5 von 5 Sternen
paperback. Zustand: New. Bestandsnummer des Verkäufers 1573675768-11-36101852